View Engine is responsible for rendering the view into html form to the browser. By default, Asp.net MVC support Web Form(ASPX) and Razor View Engine. There are many third party view engines (like Spark, Nhaml etc.) that are also available for Asp.net MVC. Now, Asp.net MVC is open source and can work with other third party view engines like Spark, Nhaml. In this article, I would like to expose the difference between Razor & Web Form View Engine
Monday, 30 December 2013
Thursday, 26 December 2013
Stack, heap, value types, reference types, boxing, and unboxing
What goes inside when you declare a variable?
When you declare a variable in a .NET application, it allocates some chunk of memory in the RAM. This memory has three things: the name of the variable, the data type of the variable, and the value of the variable.That was a simple explanation of what happens in the memory, but depending on the data type, your variable is allocated that type of memory. There are two types of memory allocation: stack memory and heap memory. In the coming sections, we will try to understand these two types of memory in more detail.

Stack and heap
In order to understand stack and heap, let’s understand what actually happens in the below code internally.public void Method1()
{
// Line 1
int i=4;
// Line 2
int y=2;
//Line 3
class1 cls1 = new class1();
}
It’s a three line code, let’s understand line by line how things execute internally.- Line 1: When this line is executed, the compiler allocates a small amount of memory in the stack. The stack is responsible for keeping track of the running memory needed in your application.
- Line 2: Now the execution moves to the next step. As the name says stack, it stacks this memory allocation on top of the first memory allocation. You can think about stack as a series of compartments or boxes put on top of each other. Memory allocation and de-allocation is done using LIFO (Last In First Out) logic. In other words memory is allocated and de-allocated at only one end of the memory, i.e., top of the stack.
- Line 3: In line 3, we have created an object. When this line is executed it creates a pointer on the stack and the actual object is stored in a different type of memory location called ‘Heap’. ‘Heap’ does not track running memory, it’s just a pile of objects which can be reached at any moment of time. Heap is used for dynamic memory allocation.
Class1 cls1; does not allocate memory for an instance of Class1, it only allocates a stack variable cls1 (and sets it to null). The time it hits the new keyword, it allocates on "heap".Exiting the method (the fun): Now finally the execution control starts exiting the method. When it passes the end control, it clears all the memory variables which are assigned on stack. In other words all variables which are related to
int data type are de-allocated in ‘LIFO’ fashion from the stack.The big catch – It did not de-allocate the heap memory. This memory will be later de-allocated by the garbage collector.

Now many of our developer friends must be wondering why two types of memory, can’t we just allocate everything on just one memory type and we are done?
If you look closely, primitive data types are not complex, they hold single values like ‘
int i = 0’. Object data types are complex, they reference other objects or other primitive data types. In other words, they hold reference to other multiple values and each one of them must be stored in memory. Object types need dynamic memory while primitive ones needs static type memory. If the requirement is of dynamic memory, it’s allocated on the heap or else it goes on a stack.Image taken from http://michaelbungartz.wordpress.com/

Value types and reference types
Now that we have understood the concept of Stack and Heap, it’s time to understand the concept of value types and reference types. Value types are types which hold both data and memory on the same location. A reference type has a pointer which points to the memory location.Below is a simple integer data type with name
i whose value is assigned to another integer data type with name j. Both these memory values are allocated on the stack. When we assign the
int value to the other int value, it creates a completely different copy. In other words, if you change either of them, the other does not change. These kinds of data types are called as ‘Value types’.
When we create an object and when we assign an object to another object, they both point to the same memory location as shown in the below code snippet. So when we assign
obj to obj1, they both point to the same memory location.In other words if we change one of them, the other object is also affected; this is termed as ‘Reference types’.

So which data types are ref types and which are value types?
In .NET depending on the data type, the variable is either assigned on the stack or on the heap. ‘String’ and ‘Objects’ are reference types, and any other .NET primitive data types are assigned on the stack. The figure below explains the same in a more detail manner.
Boxing and unboxing
Wow, you have given so much knowledge, so what’s the use of it in actual programming? One of the biggest implications is to understand the performance hit which is incurred due to data moving from stack to heap and vice versa.Consider the below code snippet. When we move a value type to reference type, data is moved from the stack to the heap. When we move a reference type to a value type, the data is moved from the heap to the stack.
This movement of data from the heap to stack and vice-versa creates a performance hit.
When the data moves from value types to reference types, it is termed ‘Boxing’ and the reverse is termed ‘UnBoxing’.

If you compile the above code and see the same in ILDASM, you can see in the IL code how ‘boxing’ and ‘unboxing’ looks. The figure below demonstrates the same.

Performance implication of boxing and unboxing
In order to see how the performance is impacted, we ran the below two functions 10,000 times. One function has boxing and the other function is simple. We used a stop watch object to monitor the time taken.The boxing function was executed in 3542 ms while without boxing, the code was executed in 2477 ms. In other words try to avoid boxing and unboxing. In a project where you need boxing and unboxing, use it when it’s absolutely necessary.
With this article, sample code is attached which demonstrates this performance implication.

Source : http://www.codeproject.com/Articles/76153/Six-important-NET-concepts-Stack-heap-value-types
Application pool recycle
Recycling the application pool means recycling the worker process (w3wp.exe) and the memory used for the web application. It is a very good practice to recycle the worker process periodically, which wll keep the application running smooth. There are two types of recycling related with the application pool:
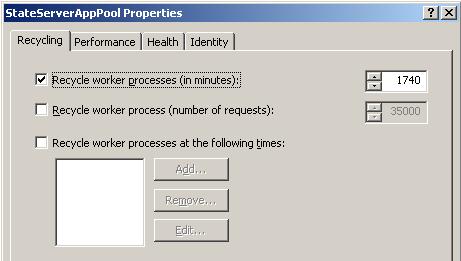
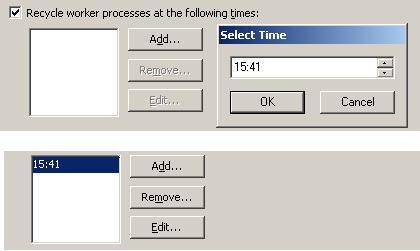

Source : http://www.codeproject.com/Articles/42724/Beginner-s-Guide-Exploring-IIS-6-0-With-ASP-NET#heading0015
- Recycling Worker Process - Predefined settings
- Recycling Worker Process - Based on memory
Recycling Worker Process - Predefined Settings
Worker process recycling is the replacing of the instance of the application in memory. IIS 6.0 can automatically recycle worker processes by restarting the worker processes that are assigned to an application pool and associated with websites. This improves web site performance and keeps web sites up and running smoothly.
Application pool recycling- Worker process
There are three types of settings available for recycling worker processes:- In minutes
- Number of requests
- At a given time
Recycle Worker Process (In Minutes)
We can set a specific time period after which a worker process will be recycled. IIS will take care of all the current running requests.Recycle Worker Process (Number of Requests)
We can configure an application with a given number of requests. Once IIS reaches that limit, the worker process will be recycled automatically.Recycle Worker Process (In Minutes)
If we want to recycle the worker process at any given time, we can do that configuration on IIS. We can also set multiple times for this.
Application pool recycling - Worker process: Time setting
Recycling Worker Process - Based on Memory
Server memory is a big concern for any web application. Sometimes we need to clean up a worker process based on the memory consumed by it. There are two types of settings that we can configure in the application pool to recycle a worker process based on memory consumption. These are:- Maximum virtual memory used
- Maximum used memory

Application pool recycling - Worker process.
At any time, if the worker process consumes the specified memory (at memory recycling settings), it will be recycled automatically.What Happens During Application Pool Recycling
This is quite an interesting question. Based on the above settings, an application pool can be recycled any time. So what happens to the users who are accessing the site at that time? We do not need to worry about that. This process is transparent from the client. When you recycle an application pool, HTTP.SYS holds onto the client connection in kernel mode while the user mode worker process recycles. After the process recycles, HTTP.SYS transparently routes the new requests to the new worker processSource : http://www.codeproject.com/Articles/42724/Beginner-s-Guide-Exploring-IIS-6-0-With-ASP-NET#heading0015
Application Pool
Application pool is the heart of a website. An Application Pool can contain multiple web sites. Application pools are used to separate sets of IIS worker processes that share the same configuration. Application pools enable us to isolate our web application for better security, reliability, and availability. The worker process serves as the process boundary that separates each application pool so that when a worker process or application is having an issue or recycles, other applications or worker processes are not affected.
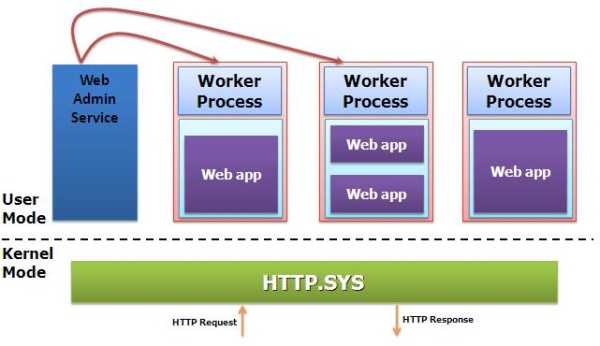
In this section, I have discussed about the creation of application pools, application pool settings, and assigning an application pool to a web site.
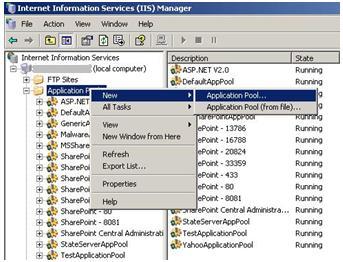
That is all about creating a new application pool. Now let us have a look at the creation of an application pool from an existing XML configuration file.
So first of all, you need to save the application pool configuration in a server. Check the below image for details.

Application pool - IIS
Generally we do it in our production environment. The main advantages of using an application pool is the isolation of worker processes to differentiate sites and we can customize the configuration for each application to achieve a certain level of performance. The maximum number of application pools that is supported by IIS is 2000.In this section, I have discussed about the creation of application pools, application pool settings, and assigning an application pool to a web site.
How to Create an Application Pool?
Application pool creation in IIS 6.0 is a very simple task. There are two different ways by which we can create an application pool. There is a pre-defined application pool available in IIS 6.0, called "DefaultApplicationPool". Below are the two ways to create an application pool:- Create New Application Pool
- Create From Existing Configuration File
Create a New Application Pool
First of all, we need to open the IIS Configuration Manager. Then right click on Application Pool and go to New > Application Pool.
Create new application pool
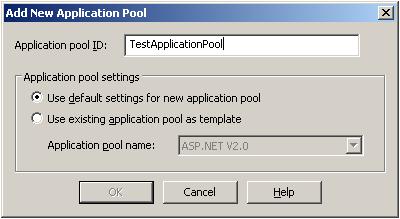
The below screen will appear, where we need to mention the application pool name.
New application pool name
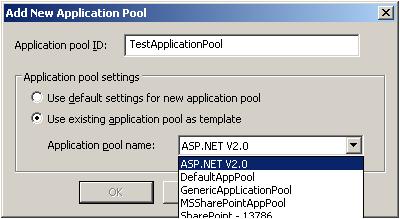
When we create a new application pool, we can use the default application setting for it. The selection of "Default Settings" means by default the application pool setting will be the same as the IIS default settings. If we want to use the configuration of an existing application pool, we need to select the section option "Use existing application pool as template". Selecting this option will enable the application pool name dropdown.
Application pool template selection
If we select an existing application pool as a template, the newly created application pool should have the same configuration of the template application pool. This reduces the time for application pool configuration.That is all about creating a new application pool. Now let us have a look at the creation of an application pool from an existing XML configuration file.
Create From Existing Configuration File
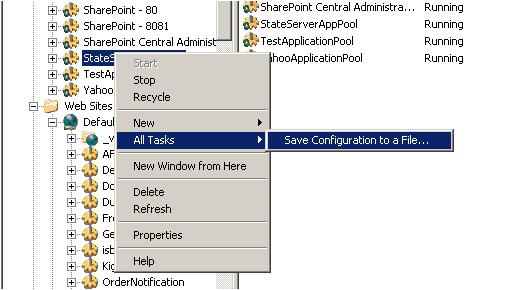
We can save the configuration of an application pool into an XML file and create a new application pool from that. This is very useful during the configuration of an application pool in a Web Farm where you have multiple web servers and you need to configure the application pool for each and every server. When you are running your web application on a Load Balancer, you need to uniquely configure your application pool.So first of all, you need to save the application pool configuration in a server. Check the below image for details.

Application pool template selection
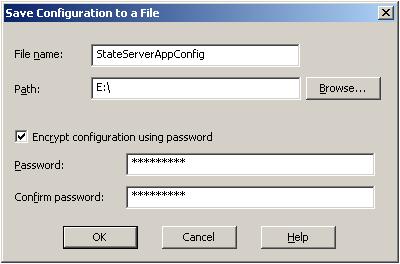
During this operation, we can set the password for the configuration file which will be asked during the import of the application pool on another server. When we click on "Save Configuration to a file", the below screen will appear.
Save configuration as XML file
Where we need to provide the file name and location. If we want, we can set a password to encrypt the XML file. Below is a part of that XML:Location ="inherited:/LM/W3SVC/AppPools/StateServerAppPool"
AdminACL="49634462f0000000a4000000400b1237aecdc1b1c110e38d00"
AllowKeepAlive="TRUE"
AnonymousUserName="IUSR_LocalSystem"
AnonymousUserPass="496344627000000024d680000000076c20200000000"
AppAllowClientDebug="FALSE"
AppAllowDebugging="FALSE"
AppPoolId="DefaultAppPool"
AppPoolIdentityType="2"
AppPoolQueueLength="1000"
AspAllowOutOfProcComponents="TRUE"
AspAllowSessionState="TRUE"
AspAppServiceFlags="0"
AspBufferingLimit="4194304"
AspBufferingOn="TRUE"
AspCalcLineNumber="TRUE"
AspCodepage="0"pre>
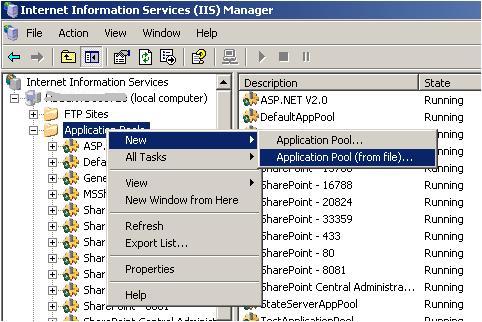
Now we can create a new application pool for this configuration file. While creating a new application pool, we have to select the "Application Pool ( From File )" option as shown in the below figure.
Application pool creation from a configuration file
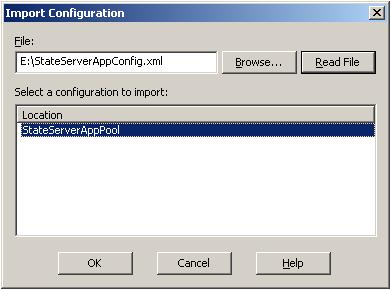
When we select this option, a screen will come where we need to enter the file name and the password of that file.
Application pool creation from configuration file
Select the file and click on the "Read File" button. This will show you the imported application pool name. Click "OK" to import the full configuration.
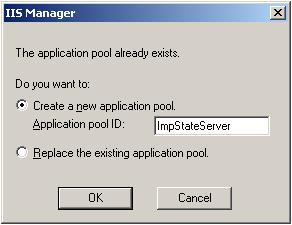
Application pool creation from configuration file
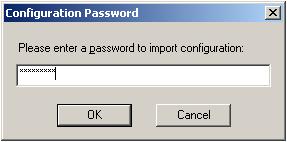
Here we need to mention the new application pool name or we can have another option where we can replace an existing application pool. For moving ahead, we need to provide the password.
Password to import application pool configuration
This is the last step for creating a new application pool from an existing configuration fileSaturday, 21 December 2013
Abstract Class vs Interface
What is an Abstract Class?
An abstract class is a special kind of class that cannot be instantiated. So the question is why we need a class that cannot be instantiated? An abstract class is only to be sub-classed (inherited from). In other words, it only allows other classes to inherit from it but cannot be instantiated. The advantage is that it enforces certain hierarchies for all the subclasses. In simple words, it is a kind of contract that forces all the subclasses to carry on the same hierarchies or standards.
What is an Interface
An interface is not a class. It is an entity that is defined by the word Interface. An interface has no implementation; it only has the signature or in other words, just the definition of the methods without the body. As one of the similarities to Abstract class, it is a contract that is used to define hierarchies for all subclasses or it defines specific set of methods and their arguments. The main difference between them is that a class can implement more than one interface but can only inherit from one abstract class. Since C# doesn't support multiple inheritance, interfaces are used to implement multiple inheritance.
When we create an interface, we are basically creating a set of methods without any implementation that must be overridden by the implemented classes. The advantage is that it provides a way for a class to be a part of two classes: one from inheritance hierarchy and one from the interface.
When we create an abstract class, we are creating a base class that might have one or more completed methods but at least one or more methods are left uncompleted and declared abstract. If all the methods of an abstract class are uncompleted then it is same as an interface. The purpose of an abstract class is to provide a base class definition for how a set of derived classes will work and then allow the programmers to fill the implementation in the derived classes.
|
I have explained the differences between an abstract class and an interface.
Wednesday, 27 November 2013
Asynchronous Programming in .Net: Async and Await for Beginners
Introduction
There are several ways of doing asynchronous programming in .Net. Visual Studio 2012 introduces a new approach using the ‘await’ and ‘async’ keywords. These tell the compiler to construct task continuations in quite an unusual way.I found them quite difficult to understand using the Microsoft documentation, which annoyingly keeps saying how easy they are.
This series of articles is intended to give a quick recap of some previous approaches to asynchronous programming to give us some context, and then to give a quick and hopefully easy introduction to the new keywords
Example
By far the easiest way to get to grips with the new keywords is by seeing an example. For this initially I am going to use a very basic example: you click a button on a screen, it runs a long-running method, and displays the results of the method on the screen.Since this article is about asynchronous programming we will want the long-running method to run asynchronously on a background thread. This means we need to marshal the results back on to the user interface thread to display them.
In the real world the method could be running a report, or calling a web service. Here we will just use the method below, which sleeps to simulate the long-running process:
        private string LongRunningMethod(string message)
        {
            Thread.Sleep(2000);
            return "Hello " + message;
        }
The method will be called asynchronously from a button click method, with the results assigned to the content of a label.
Coding the Example with Previous Asynchronous C# Approaches
There are at least five standard ways of coding the example above in .Net currently. This has got so confusing that Microsoft have started giving the various patterns acronyms, such as the ‘EAP‘ and the ‘APM‘. I’m not going to talk about those as they are effectively deprecated. However it’s worth having a quick look at how to do our example using some of the other approaches.Coding the Example by Starting our Own Thread
This simple example is fairly easy to code by just explicitly starting a new thread and then using Invoke or BeginInvoke to get the results back onto the UI thread. This should be familiar to you:private void Button_Click_1(object sender, RoutedEventArgs e) { new Thread(() => { string result = LongRunningMethod("World"); Dispatcher.BeginInvoke((Action)(() => Label1.Content = result)); }).Start(); Label1.Content = "Working..."; }We start a new thread and hand it the code we want to run. This calls the long-running method and then uses Dispatcher.BeginInvoke to call back onto the user interface thread with the result and update our label.
Note that immediately after we start the new thread we set the content of our label to ‘Working…’. This is to show that the button click method continues immediately on the user interface thread after the new thread is started.
The result is that when we click the button our label says ‘Working…’ almost immediately, and then shows ‘Hello World’ when the long-running method returns. The user interface will remain responsive whilst the long-running thread is running.
Coding the Example Using the Task Parallel Library (TPL)
More instructive is to revisit how we would do this with tasks using the Task Parallel Library. We would typically use a task continuation as below.private void Button_Click_2(object sender, RoutedEventArgs e) { Task.Run<string>(() => LongRunningMethod("World")) .ContinueWith(ant => Label2.Content = ant.Result, TaskScheduler.FromCurrentSynchronizationContext()); Label2.Content = "Working..."; }Here we’ve started a task on a background thread using Task.Run. This is a new construct in .Net 4.5. However, it is nothing more complicated than Task.Factory.StartNew with preset parameters. The parameters are the ones you usually want to use. In particular Task.Run uses the default Task Scheduler and so avoids one of the hidden problems with StartNew.
The task calls the long-running method, and does so on a threadpool thread. When it is done a continuation runs using ContinueWith. We want this to run on the user interface thread so it can update our label. So we specify that it should use the task scheduler in the current synchronization context, which is the user interface thread when the task is set up.
Again we update the label after the task call to show that it returns immediately. If we run this we’ll see a ‘Working…’ message and then ‘Hello World’ when the long-running method returns.
Coding the Example Using Async and Await
Code
Below is the full code for the async/await implementation of the example above. We will go through this in detail.private void Button_Click_3(object sender, RoutedEventArgs e) { CallLongRunningMethod(); Label3.Content = "Working..."; } private async void CallLongRunningMethod() { string result = await LongRunningMethodAsync("World"); Label3.Content = result; } private Task<string> LongRunningMethodAsync(string message) { return Task.Run<string>(() => LongRunningMethod(message)); } private string LongRunningMethod(string message) { Thread.Sleep(2000); return "Hello " + message; }
Asynchronous Methods
The first thing to realize about the async and await keywords is that by themselves they never start a thread. They are a way of controlling continuations, not a way of starting asynchronous code.As a result the usual pattern is to create an asynchronous method that can be used with async/await, or to use an asynchronous method that is already in the framework. For these purposes a number of new asynchronous methods have been added to the framework.
To be useful to async/await the asynchronous method has to return a task. The asynchronous method has to start the task it returns as well, something that maybe isn’t so obvious.
So in our example we need to make our synchronous long-running method into an asynchronous method. The method will start a task to run the long-running method and return it. The usual approach is to wrap the method in a new method. It is usual to give the method the same name but append ‘Async’. Below is the code to do this for the method in our example:
        private Task<string> LongRunningMethodAsync(string message)
        {
            return Task.Run<string>(() => LongRunningMethod(message));
        }
Note that we could use this method directly in our example without async/await. We could call it and use ‘ContinueWith’ on the return value to effect our continuation in exactly the same way as in the Task Parallel Library code above. This is true of the new async methods in the framework as well.
Async/Await and Method Scope
Async and await are a smart way of controlling continuations through method scope. They are used as a pair in a method as shown below:private async void CallLongRunningMethod() { string result = await LongRunningMethodAsync("World"); Label3.Content = result; }Here async is simply used to tell the compiler that this is an asynchronous method that will have an await in it. It’s the await itself that’s interesting.
The first line in the method calls LongRunningMethodAsync, clearly. Remember that LongRunningMethodAsync is returning a long-running task that is running on another thread. LongRunningMethodAsync starts the task and then returns reasonably quickly.
The await keyword ensures that the remainder of the method does not execute until the long-running task is complete. It sets up a continuation for the remainder of the method. Once the long-running method is complete the label content will update: note that this happens on the same thread that CallLongRunningMethod is already running on, in this case the user interface thread.
However, the await keyword does not block the thread completely. Instead control is returned to the calling method on the same thread. That is, the method that called CallLongRunningMethod will execute at the point after the call was made.
The code that calls LongRunningMethod is below:
        private void Button_Click_3(object sender, RoutedEventArgs e)
        {
            CallLongRunningMethod();
            Label3.Content = "Working...";
        }
So the end result of this is exactly the same as before. When the button is clicked the label has content ‘Working…’ almost immediately, and then shows ‘Hello World’ when the long-running task completes.
Return Type
One other thing to note is that LongRunningMethodAsync returns a Task<string>, that is, a Task that returns a string. However the line below assigns the result of the task to the string variable called ‘result’, not the task itself.string result = await LongRunningMethodAsync("World");The await keyword ‘unwraps’ the task. We could have attempted to access the Result property of the task (string result = LongRunningMethodAsync(“World”).Result. This would have worked but would have simply blocked the user interface thread until the method completed, which is not what we’re trying to do.
I’ll discuss this further below.
Recap
To recap, the button click calls CallLongRunningMethod, which in turn calls LongRunningMethodAsync, which sets up and runs our long-running task. When the task is set up (not when it’s completed) control returns to CallLongRunningMethod, where the await keyword passes control back to the button click method.So almost immediately the label content will be set to “Working…”, and the button click method will exit, leaving the user interface responsive.
When the task is complete the remainder of CallLongRunningMethod executes as a continuation on the user interface thread, and sets the label to “Hello World”.
Async and Await are a Pair
Async and await are always a pair: you can’t use await in a method unless the method is marked async, and if you mark a method async without await in it then you get a compiler warning. You can of course have multiple awaits in one method as long as it is marked async.Aside: Using Anonymous Methods with Async/Await
If you compare the code for the Task Parallel Library (TPL) example with the async/await example you’ll see that we’ve had to introduce two new methods for async/await: for this simple example the TPL code is shorter and arguably easier to understand. However, it is possible to shorten the async/await code using anonymous methods, as below. This shows how we can use anonymous method syntax with async/await, although I think this code is borderline incomprehensible:private void Button_Click_4(object sender, RoutedEventArgs e) { new Action(async () => { string result = await Task.Run<string>(() => LongRunningMethod("World")); Label4.Content = result; }).Invoke(); Label4.Content = "Working..."; }
Using the Call Stack to Control Continuations
Overview of Return Values from Methods Marked as Async
There’s one other fundamental aspect of async/await that we have not yet looked at. In the example above our method marked with the async keyword did not return anything. However, we can make all our async methods return values wrapped in a task, which means they in turn can be awaited on further up the call stack. In general this is considered good practice: it means we can control the flow of our continuations more easily.The compiler makes it easy for us to return a value wrapped in a task from an async method. In a method marked async the ‘return’ statement works differently from usual. The compiler doesn’t simply return the value passed with the statement, but instead wraps it in a task and returns that instead.
Example of Return Values from Methods Marked as Async
Again this is easiest to see with our example. Our method marked as async was CallLongRunningMethod, and this can be altered to return the string result to the calling method as below:private async Task<string> CallLongRunningMethodReturn() { string result = await LongRunningMethodAsync("World"); return result; }We are returning a string (‘return result’), but the method signature shows the return type as Task<string>. Personally I think this is a little confusing, but as discussed it means the calling method can await on this method. Now we can change the calling method as below:
        private async void Button_Click_5(object sender, RoutedEventArgs e)
        {
            Label5.Content = "Working...";
            string result = await CallLongRunningMethodReturn();
            Label5.Content = result;
        }
We can await the method lower down the call stack because it now returns a task we can await on. What this means in practice is that the code sets up the task and sets it running and then we can await the results from the task when it is complete anywhere in the call stack. This gives us a lot of flexibility as methods at various points in the stack can carry on executing until they need the results of the call.
As discussed above when we await on a method returning type Task<string> we can just assign the result to a string as shown. This is clearly related to the ability to just return a string from the method: these are syntactic conveniences to avoid the programmer having to deal directly with the tasks in async/await.
Note that we have to mark our method as ‘async’ in the method signature (‘private async void Button_Click_5′) because it now has an await in it, and they always go together.
What the Code Does
The code above has exactly the same result as the other examples: the label shows ‘Working…’ until the long-running method returns when it shows ‘Hello World’. When the button is clicked it sets up the task to run the long-running method and then awaits its completion both in CallLongRunningMethodReturn and Button_Click_5. There is one slight difference in that the click event is awaiting: previously it exited. However, if you run the examples you’ll see that the user interface remains responsive whilst the task is running.What’s The Point?
If you’ve followed all the examples so far you may be wondering what the point is of the new keywords. For this simple example the Task Parallel Library syntax is shorter, cleaner and probably easier to understand than the async/await syntax. At first sight async/await are a little confusing.The answer is that for basic examples async/await don’t seem to me to be adding a lot of value, but as soon as you try to do more complex continuations they come into their own. For example it’s possible to set up multiple tasks in a loop and write very simple code to deal with what happens when they complete, something that is tricky with tasks. I suggest you look at the examples in the Microsoft documentation which do show the power of the new keywords
Source : http://richnewman.wordpress.com/2012/12/03/tutorial-asynchronous-programming-async-and-await-for-beginners/
Tuesday, 18 June 2013
Difference between Execute Scalar , Execute Reader and ExecuteNonQuery?
ExecuteNonQuery():
- will work with Action Queries only (Create,Alter,Drop,Insert,Update,Delete).
- Returns the count of rows effected by the Query.
- Return type is int
- Return value is optional and can be assigned to an integer variable.
ExecuteReader():
- will work with Action and Non-Action Queries (Select)
- Returns the collection of rows selected by the Query.
- Return type is DataReader.
- Return value is compulsory and should be assigned to an another object DataReader.
ExecuteScalar():
- will work with Non-Action Queries that contain aggregate functions.
- Return the first row and first column value of the query result.
- Return type is object.
- Return value is compulsory and should be assigned to a variable of required type.
Monday, 27 May 2013
Sequence that events are raised for Pages, UserControls, MasterPages and HttpModules
Understanding the Page Life Cycle can be very important as you begin to build Pages with MasterPages and UserControls.
Does the Init event fire first for the Page, the MasterPage or the UserControl?
What about the Load event?
If you make an incorrect assumption about the sequence that these events fire, then you may end up with a page that simply doesn't behave the way you had anticipated.
By running a simple test, we can see exactly when each event fires. Our test setup is composed of a Page, MasterPage, UserControl, Nested UserControl and Button control as follows:
BeginRequest - HttpModule
AuthenticateRequest - HttpModule
PostAuthenticateRequest - HttpModule
PostAuthorizeRequest - HttpModule
ResolveRequestCache - HttpModule
PostResolveRequestCache - HttpModule
PostMapRequestHandler - HttpModule
AcquireRequestState - HttpModule
PostAcquireRequestState - HttpModule
PreRequestHandlerExecute - HttpModule
PreInit - Page
Init - ChildUserControl
Init - UserControl
Init - MasterPage
Init - Page
InitComplete - Page
LoadPageStateFromPersistenceMedium - Page
ProcessPostData (first try) - Page
PreLoad - Page
Load - Page
Load - MasterPage
Load - UserControl
Load - ChildUserControl
ProcessPostData (second try) - Page
RaiseChangedEvents - Page
RaisePostBackEvent - Page
Click - Button - ChildUserControl
DataBinding - Page
DataBinding - MasterPage
DataBinding - UserControl
DataBinding - ChildUserControl
LoadComplete - Page
PreRender - Page
PreRender - MasterPage
PreRender - UserControl
PreRender - ChildUserControl
PreRenderComplete - Page
SaveViewState - Page
SavePageStateToPersistenceMedium - Page
SaveStateComplete - Page
Unload - ChildUserControl
Unload - UserControl
Unload - MasterPage
Unload - Page
PostRequestHandlerExecute - HttpModule
ReleaseRequestState - HttpModule
PostReleaseRequestState - HttpModule
UpdateRequestCache - HttpModule
PostUpdateRequestCache - HttpModule
EndRequest - HttpModule
PreSendRequestHeaders - HttpModule
PreSendRequestContent - HttpModule
Does the Init event fire first for the Page, the MasterPage or the UserControl?
What about the Load event?
If you make an incorrect assumption about the sequence that these events fire, then you may end up with a page that simply doesn't behave the way you had anticipated.
By running a simple test, we can see exactly when each event fires. Our test setup is composed of a Page, MasterPage, UserControl, Nested UserControl and Button control as follows:
- The Page is tied to the MasterPage
- The UserControl is on the Page
- The Nested UserControl is on the UserControl
- The Button is on the Nested UserControl.
- Clicking the Button calls the Page.DataBind method
BeginRequest - HttpModule
AuthenticateRequest - HttpModule
PostAuthenticateRequest - HttpModule
PostAuthorizeRequest - HttpModule
ResolveRequestCache - HttpModule
PostResolveRequestCache - HttpModule
PostMapRequestHandler - HttpModule
AcquireRequestState - HttpModule
PostAcquireRequestState - HttpModule
PreRequestHandlerExecute - HttpModule
PreInit - Page
Init - ChildUserControl
Init - UserControl
Init - MasterPage
Init - Page
InitComplete - Page
LoadPageStateFromPersistenceMedium - Page
ProcessPostData (first try) - Page
PreLoad - Page
Load - Page
Load - MasterPage
Load - UserControl
Load - ChildUserControl
ProcessPostData (second try) - Page
RaiseChangedEvents - Page
RaisePostBackEvent - Page
Click - Button - ChildUserControl
DataBinding - Page
DataBinding - MasterPage
DataBinding - UserControl
DataBinding - ChildUserControl
LoadComplete - Page
PreRender - Page
PreRender - MasterPage
PreRender - UserControl
PreRender - ChildUserControl
PreRenderComplete - Page
SaveViewState - Page
SavePageStateToPersistenceMedium - Page
SaveStateComplete - Page
Unload - ChildUserControl
Unload - UserControl
Unload - MasterPage
Unload - Page
PostRequestHandlerExecute - HttpModule
ReleaseRequestState - HttpModule
PostReleaseRequestState - HttpModule
UpdateRequestCache - HttpModule
PostUpdateRequestCache - HttpModule
EndRequest - HttpModule
PreSendRequestHeaders - HttpModule
PreSendRequestContent - HttpModule
Wednesday, 27 February 2013
Parallel Programming in .Net
Introduction to TPL(Task Parallel Library)
I have to admit that I’m not an expert in multithreading or parallel computing. However, people often ask me about easy introductions and beginner’s samples for new features. And I have an enormous advantage over most newbies in this area – I can ask people who developed this library about what I’m doing wrong and what to do next. By the way, if you want to ask someone about what to do next with your parallel program, I'd recommend you to go to this forum Parallel Extensions to the .NET Framework Forum.I have a simple goal this time. I want to parallelize a long-running console application and add a responsive WPF UI. By the way, I’m not going to concentrate too much on measuring performance. I’ll try to show the most common caveats, but in most cases just seeing that the application runs faster is good enough for me.
Now, let the journey begin. Here’s my small program that I want to parallelize. The SumRootN method returns the sum of the nth root of all integers from one to 10 million, where n is a parameter. In the Main method, I call this method for roots from 2 through 19. I’m using the Stopwatch class to check how many milliseconds the program takes to run
using System.Threading.Tasks;
using System.Threading;
using System.Diagnostics;
using System;
class Program
{
static void Main(string[] args)
{
var watch = Stopwatch.StartNew();
for (int i = 2; i < 20; i++)
{
var result = SumRootN(i);
Console.WriteLine("root {0} : {1} ", i, result);
}
Console.WriteLine(watch.ElapsedMilliseconds);
Console.ReadLine();
}
public static double SumRootN(int root)
{
double result = 0;
for (int i = 1; i < 10000000; i++)
{
result += Math.Exp(Math.Log(i) / root);
}
return result;
}
}
On my 3-GHz dual-core 64-bit computer with 4 GB of RAM the program takes about 18 seconds to run. using System.Threading;
using System.Diagnostics;
using System;
class Program
{
static void Main(string[] args)
{
var watch = Stopwatch.StartNew();
for (int i = 2; i < 20; i++)
{
var result = SumRootN(i);
Console.WriteLine("root {0} : {1} ", i, result);
}
Console.WriteLine(watch.ElapsedMilliseconds);
Console.ReadLine();
}
public static double SumRootN(int root)
{
double result = 0;
for (int i = 1; i < 10000000; i++)
{
result += Math.Exp(Math.Log(i) / root);
}
return result;
}
}
Since I’m using a for loop, the Parallel.For method is the easiest way to add parallelism. All I need to do is replace
for (int i = 2; i < 20; i++)
{
var result = SumRootN(i);
Console.WriteLine("root {0} : {1} ", i, result);
}
{
var result = SumRootN(i);
Console.WriteLine("root {0} : {1} ", i, result);
}
Parallel.For(2, 20, (i) =>
{
var result = SumRootN(i);
Console.WriteLine("root {0} : {1} ", i, result);
});
Notice how little the code changed. I supplied start and end indices (same as I did in the simple loop) and a delegate in the form of a lambda expression. I didn’t have to change anything else, and now my little program takes about 9 seconds.{
var result = SumRootN(i);
Console.WriteLine("root {0} : {1} ", i, result);
});
When you use the Parallel.For method, the .NET Framework automatically manages the threads that service the loop, so you don’t need to do this yourself. But remember that running code in parallel on two processors does not guarantee that the code will run exactly twice as fast. Nothing comes for free; although you don’t need to manage threads yourself, the .NET Framework still uses them behind the scenes. And of course this leads to some overhead. In fact, if your operation is simple and fast and you run a lot of short parallel cycles, you may get much less benefit from parallelization than you might expect.
Another thing you probably noticed when you run the code is that now you don’t see the results in the proper order: Instead of seeing increasing roots, you see quite a different picture. But let’s pretend that we just need results, without any specific order. In this blog post, I’m going to leave this problem unresolved.
Now it’s time to take things one step further. I don’t want to write a console application; I want some UI. So I’m switching to Windows Presentation Foundation (WPF). I have created a small window that has only one Start button, one text block to display results, and one label to show elapsed time.
The event handler for the sequential execution looks pretty simple:
private void start_Click(object sender, RoutedEventArgs e)
{
textBlock1.Text = "";
label1.Content = "Milliseconds: ";
var watch = Stopwatch.StartNew();
for (int i = 2; i < 20; i++)
{
var result = SumRootN(i);
textBlock1.Text += "root " + i.ToString() + " " +
result.ToString() + Environment.NewLine;
}
var time = watch.ElapsedMilliseconds;
label1.Content += time.ToString();
}
{
textBlock1.Text = "";
label1.Content = "Milliseconds: ";
var watch = Stopwatch.StartNew();
for (int i = 2; i < 20; i++)
{
var result = SumRootN(i);
textBlock1.Text += "root " + i.ToString() + " " +
result.ToString() + Environment.NewLine;
}
var time = watch.ElapsedMilliseconds;
label1.Content += time.ToString();
}
Compile and run the application to make sure that everything works fine. As you might notice, UI is frozen and the text block does not update until all of the computations are done. This is a good demonstration of why WPF recommends never executing long-running operations in the UI thread.
Let’s change the for loop to the parallel one:
Parallel.For(2, 20, (i) =>
{
var result = SumRootN(i);
textBlock1.Text += "root " + i.ToString() + " " +
result.ToString() + Environment.NewLine;
});
{
var result = SumRootN(i);
textBlock1.Text += "root " + i.ToString() + " " +
result.ToString() + Environment.NewLine;
});
Click the button…and…get an InvalidOperationException that says “The calling thread cannot access this object because a different thread owns it.”
What happened? Well, as I mentioned earlier, the Task Parallel Library still uses threads. When you call the Parallel.For method, the .NET Framework starts new threads automatically. I didn’t have problems with the console application because the Console class is thread safe. But in WPF, UI components can be safely accessed only by a dedicated UI thread. Since Parallel.For uses worker threads besides the UI thread, it’s unsafe to manipulate the text block directly in the parallel loop body. If you use, let’s say, Windows Forms, you might have different problems, but problems nonetheless (another exception or even an application crash).
Luckily, WPF provides an API that solves this problem. Most controls have a special Dispatcher object that enables other threads to interact with the UI thread by sending asynchronous messages to it. So our parallel loop should actually look like this:
Parallel.For(2, 20, (i) =>
{
var result = SumRootN(i);
this.Dispatcher.BeginInvoke(new Action(() =>
textBlock1.Text += "root " + i.ToString() + " " +
result.ToString() + Environment.NewLine)
, null);
});
{
var result = SumRootN(i);
this.Dispatcher.BeginInvoke(new Action(() =>
textBlock1.Text += "root " + i.ToString() + " " +
result.ToString() + Environment.NewLine)
, null);
});
In the above code, I’m using the Dispatcher to send a delegate to the UI thread. The delegate will be executed when the UI thread is idle. If UI is busy doing something else, the delegate will be put into a queue. But remember that this type of interaction with the UI thread may slow down your application.
Now I have our parallel WPF application running on my computer almost twice fast. But what about this freezing UI? Don’t all modern applications have responsive UI? And if Parallel.For starts new threads, why is the UI thread still blocked?
The reason is that Parallel.For tries to exactly imitate the behavior of the normal for loop, so it blocks the further code execution until it finishes all its work.
Let’s take a short pause here. If you already have an application that works and satisfies all your requirements, and you want to simply speed it up by using parallel processing, it might be enough just to replace some of the loops with Parallel.For or Parallel.ForEach. But in many cases you need more advanced tools.
To make the UI responsive, I am going to use tasks, which is a new concept introduced by the Task Parallel Library. A task represents an asynchronous operation that is often run on a separate thread. The .NET Framework optimizes load balancing and also provides a nice API for managing tasks and making asynchronous calls between them. To start an asynchronous operation, I’ll use the Task.Factory.StartNew method.
So I’ll delete the Parallel.For and replace it with the following code, once again trying to change as little as possible.
for (int i = 2; i < 20; i++)
{
var t = Task.Factory.StartNew(() =>
{
var result = SumRootN(i);
this.Dispatcher.BeginInvoke(new Action(() =>
textBlock1.Text += "root " + i.ToString() + " " +
result.ToString() + Environment.NewLine)
,null);
});
}
Compile, run… Well, UI is responsive. I can move and resize the window while the program calculates the results. But I have two problems now: {
var t = Task.Factory.StartNew(() =>
{
var result = SumRootN(i);
this.Dispatcher.BeginInvoke(new Action(() =>
textBlock1.Text += "root " + i.ToString() + " " +
result.ToString() + Environment.NewLine)
,null);
});
}
1. My program tells me that it took 0 milliseconds to execute.
2. The program calculates the method only for root 20 and shows me a list of identical results.
Let’s start with the last one. C# experts can shout it out: closure! Yes, i is used in a loop, so when a thread starts working, i’s value has already changed. Since i is equal to 20 when the loop is exited, this is the value that is always passed to newly created tasks.
Problems with closure like this one are common when you deal with lots of delegates in the form of lambda expressions (which is almost inevitable with asynchronous programming), so watch out for it. The solution is really easy. Just copy the value of the loop variable into a variable declared within the loop. Then use this local variable instead of the loop variable
for (int i = 2; i < 20; i++)
{
int j = i;
var t = Task.Factory.StartNew(() =>
{
var result = SumRootN(j);
this.Dispatcher.BeginInvoke(new Action(() =>
textBlock1.Text += "root " + j.ToString() + " " +
result.ToString() + Environment.NewLine)
, null);
});
}
{
int j = i;
var t = Task.Factory.StartNew(() =>
{
var result = SumRootN(j);
this.Dispatcher.BeginInvoke(new Action(() =>
textBlock1.Text += "root " + j.ToString() + " " +
result.ToString() + Environment.NewLine)
, null);
});
}
Now let’s move to the second problem: The execution time isn’t measured. I perform the tasks asynchronously, so nothing blocks the code execution. The program starts the tasks and goes to the next line, which is reading time and displaying it. And it doesn’t take that long, so I get 0 on my timer.
Sometimes it’s OK to move on without waiting for the threads to finish their jobs. But sometimes you need to get a signal that the work is done, because it affects your workflow. A timer is a good example of the second scenario.
To get my time measurement, I have to wrap code that reads the timer value into yet another method from the Task Parallel Library: TaskFactory.ContinueWhenAll. It does exactly what I need: It waits for all the threads in an array to finish and then executes the delegate. This method works on arrays only, so I need to store all the tasks somewhere to be able to wait for them all to finish.
Here’s what my final code looks like:
Again, I tried to cover common problems that most beginners in parallel programming and multithreading are likely to encounter, without getting too deep into details
Sometimes it’s OK to move on without waiting for the threads to finish their jobs. But sometimes you need to get a signal that the work is done, because it affects your workflow. A timer is a good example of the second scenario.
To get my time measurement, I have to wrap code that reads the timer value into yet another method from the Task Parallel Library: TaskFactory.ContinueWhenAll. It does exactly what I need: It waits for all the threads in an array to finish and then executes the delegate. This method works on arrays only, so I need to store all the tasks somewhere to be able to wait for them all to finish.
Here’s what my final code looks like:
public partial class MainWindow : Window
{
public MainWindow()
{
InitializeComponent();
}
public static double SumRootN(int root)
{
double result = 0;
for (int i = 1; i < 10000000; i++)
{
result += Math.Exp(Math.Log(i) / root);
}
return result;
}
private void start_Click(object sender, RoutedEventArgs e)
{
textBlock1.Text = "";
label1.Content = "Milliseconds: ";
var watch = Stopwatch.StartNew();
List<Task> tasks = new List<Task>();
for (int i = 2; i < 20; i++)
{
int j = i;
var t = Task.Factory.StartNew(() =>
{
var result = SumRootN(j);
this.Dispatcher.BeginInvoke(new Action(() =>
textBlock1.Text += "root " + j.ToString() + " " +
result.ToString() +
Environment.NewLine)
, null);
});
tasks.Add(t);
}
Task.Factory.ContinueWhenAll(tasks.ToArray(),
result =>
{
var time = watch.ElapsedMilliseconds;
this.Dispatcher.BeginInvoke(new Action(() =>
label1.Content += time.ToString()));
});
}
}
Finally, everything works as expected: I have a list of results, the UI does not freeze, and the elapsed time displays correctly. The code definitely looks quite different from what I started with, but surprisingly it’s not that long, and I was able to reuse most of it (thanks to lambda expression syntax). {
public MainWindow()
{
InitializeComponent();
}
public static double SumRootN(int root)
{
double result = 0;
for (int i = 1; i < 10000000; i++)
{
result += Math.Exp(Math.Log(i) / root);
}
return result;
}
private void start_Click(object sender, RoutedEventArgs e)
{
textBlock1.Text = "";
label1.Content = "Milliseconds: ";
var watch = Stopwatch.StartNew();
List<Task> tasks = new List<Task>();
for (int i = 2; i < 20; i++)
{
int j = i;
var t = Task.Factory.StartNew(() =>
{
var result = SumRootN(j);
this.Dispatcher.BeginInvoke(new Action(() =>
textBlock1.Text += "root " + j.ToString() + " " +
result.ToString() +
Environment.NewLine)
, null);
});
tasks.Add(t);
}
Task.Factory.ContinueWhenAll(tasks.ToArray(),
result =>
{
var time = watch.ElapsedMilliseconds;
this.Dispatcher.BeginInvoke(new Action(() =>
label1.Content += time.ToString()));
});
}
}
Again, I tried to cover common problems that most beginners in parallel programming and multithreading are likely to encounter, without getting too deep into details
Subscribe to:
Comments (Atom)
